Snorkel Manual
What is Snorkel?
Snorkel is a VST3/AU synthesizer plugin for Windows, macOS, and iPad that puts musical exploration at the heart of your workflow. Rather than starting from a blank patch or scrolling through presets, Snorkel uses deep randomization to generate musically meaningful starting points: complete ideas with rhythm, melody, harmony, and sound design that you can shape into something uniquely yours.
At its core, Snorkel combines seven powerful modules:
- Patterns: a grid-based 16-step sequencer for fast idea generation
- Arpeggiator: a reimagined arpeggiator with controls that go far beyond traditional arps
- Chords: a chord generator with a built-in gater effect
- Melody: a single melodic line written over the song's chords
- Synth: a full-featured engine with three oscillators and dual filters
- Drums: a dedicated drum machine for generating percussive patterns and grooves
- Sequencer: ties everything together into complete musical ideas
Patterns, Arpeggiator, Chords, Melody and Drums each carry their own sequencing. The first four also have a complete synth voice of their own, so they can play four different sounds at once; the Drums play samples instead. The Sequencer arranges the five engines into a song, and the Presets and Settings tabs hold the housekeeping.
At the very bottom of the window sits the messaging strip. Every control you touch reports itself there, and most add a one-line description of what they do, so the plugin explains itself as you work.
Every parameter that the randomizer touches is fully editable. You stay in control at all times: Snorkel suggests, you decide. Whether you want to move fast or go deep into sound design, Snorkel is designed to keep things moving.
Key Concepts
- Global Scale and Root: The Root and Scale settings in the main menu bar apply globally to every module in Snorkel. The Patterns grid, Arpeggiator, Chords engine, and all randomization operations work within the same key at all times. Changing the Root or Scale mid-session instantly transposes the entire patch. The Drums are the exception: they play samples, not notes, so they ignore both settings.
- Random and Mutate: Every module has two flavors of randomization. Random generates something entirely new (new notes, new rhythms, new parameter values), useful for quickly finding a starting point or taking an idea in an unexpected direction. Mutate makes small, incremental changes to what is already there, nudging a pattern slightly without discarding it.
- 16-Step Grids: Patterns, Arpeggiator, Chords, and Drums each use a 16-step grid as their core building block. Each module assigns its own meaning to the steps: notes in Patterns, gate events in Arp and Chords, drum hits in Drums.
- The Step Modulator: Patterns, Arpeggiator and Chords each have a Modulator sub-tab whose 16 steps draw a modulation shape for that engine's synth, with fixed accents for filter cutoff, resonance, drive and decay. The Synth has a Modulator sub-tab of its own that works the same way but runs at its own rate.
- Scenes and the Sequencer: Patterns, Arpeggiator, Chords and Drums each store up to 16 independent scenes, each a complete snapshot of that module's pattern and settings. The Sequencer tab ties them together into a 16-step arrangement matrix where each module can switch to a different scene on each step. This is how Snorkel moves beyond a single looping idea into longer, evolving structures.
- The Synth: Snorkel includes a capable built-in synthesizer that is deeply woven into every other feature. There is a separate engine for each melodic generator: Patterns, Arpeggiator, Chords and Melody each have their own independent synth with three oscillators, dual filters, an FX chain, a three-band EQ, a step modulator, four LFOs and four envelopes. All synth parameters can be randomized and mutated just like everything else.
Patterns
The Patterns module is a grid-based 16-step sequencer designed for rapid melodic idea generation. Each step can be toggled on or off and assigned a pitch, letting you sketch out musical phrases quickly. Combined with Snorkel's randomization, Patterns becomes a powerful tool for discovering unexpected melodies and rhythmic motifs.
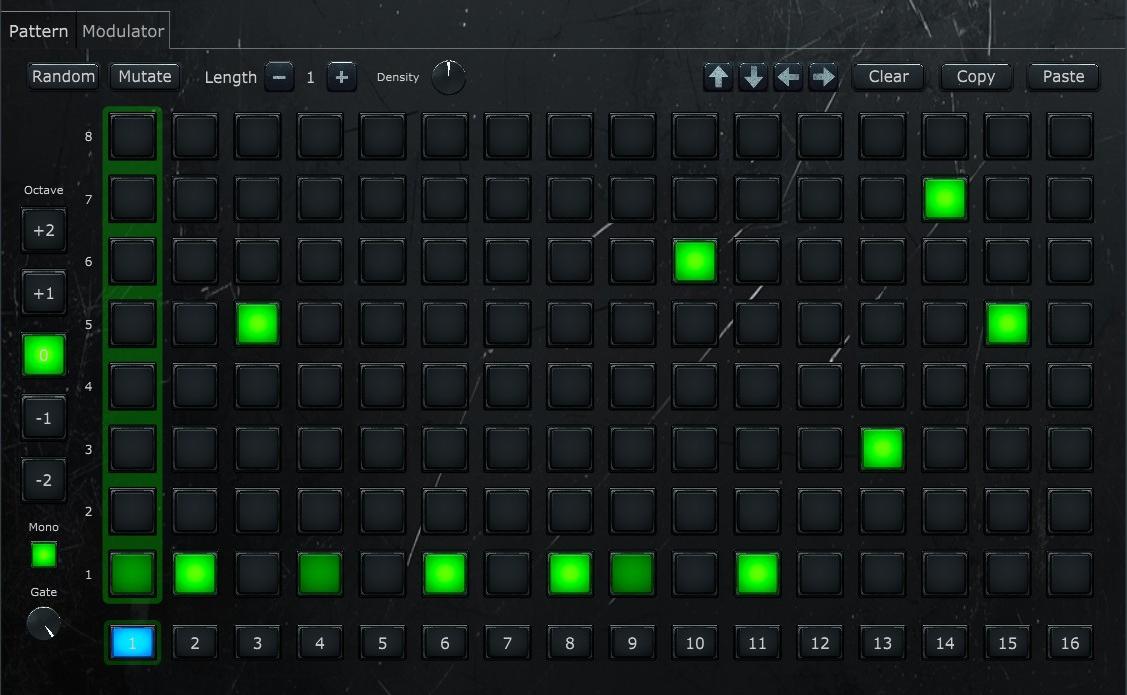
Patterns: Pattern Grid
The Pattern sub-tab is where you compose melodic patterns on a 16-step grid. Each step can hold one or more notes from the current scale. Up to 16 scenes can be created and chained together using the Playback selector or the Sequencer module.
See Tab Menu Bar and Sub-Tab Menu Bar for the general menus.
Note Grid
A 16-column by 8-row grid. Each column is a step; each row is a scale degree, numbered 1 at the bottom to 8 at the top. Row 8 is the root an octave up, so it is the same pitch as row 1 one octave higher. Click a cell to place a note, click it again to remove it.
Side Controls
Located to the left of the grid:
- Octave buttons (−2 to +2): Which octave a click adds a note in. Notes already placed at other octaves stay visible as dimmer marks, so a pattern spread over several octaves is still readable from any one of them.
- Mono: One note per step. With Mono on, clicking a cell clears whatever else that step held. Turn it off to build chords in the grid. Enabled by default.
- Gate: How much of each step the note holds. At 100% the notes run into each other; lower values leave gaps.
Scene Selector
A row of 16 numbered buttons at the bottom of the tab. Each button selects a scene to edit. All controls on the Pattern tab reflect the currently selected scene. Scenes are independent: each has its own note data across all octave layers.
Patterns: Modulator
A 16-step modulation grid modulating the Patterns synth engine, running at the Patterns engine's own Rate. See Step Modulator for the full reference.
Arpeggiator
Snorkel's Arpeggiator goes far beyond traditional arp designs. With deep and detailed controls over note order, rhythm and range, it transforms simple chord input into complex, evolving patterns. The randomization engine can generate entirely new arpeggio configurations, giving you a constantly fresh source of rhythmic and melodic movement.
The following video demonstrates the Arpeggiator in action:
Arpeggiator: Arp
The Arp tab is where you design individual arpeggiator scenes. Each scene defines its own chord input, arpeggiator behavior, and 16-step pattern. Up to 16 scenes can be created and sequenced together using the Playback selector or the Sequencer module.
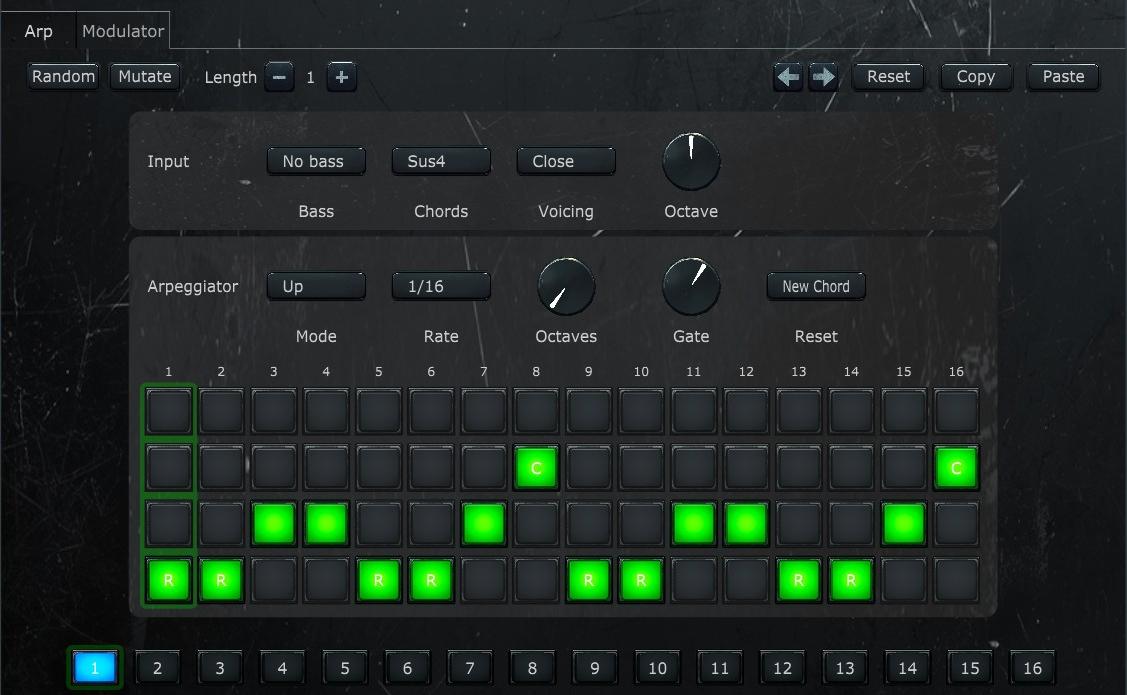
See Tab Menu Bar and Sub-Tab Menu Bar for the general menus.
Input Section
The first row builds the chord the arpeggiator will play.
- Input: Builds a chord from each incoming MIDI note, using the settings in this row. When off, the notes play as they arrive. (Only visible in plugin mode.)
- Bass: What is added below the chord. Options: no bass; the root an octave down; the root one and two octaves down; the fifth an octave down; root and fifth together; or a pedal bass that holds the scale's root under every chord whatever degree is playing.
- Chords: Which chord is built from the current scale degree. Off makes no notes of its own, so only the Bass setting can sound. Root is a single note, Octave adds the note an octave up, Power is root and fifth with no third, Triad and Seventh are taken from the current scale, Sus4 and Sus2 replace the third, and 9th and 11th stack extensions on the seventh chord.
- Voicing: How the chord's notes are laid out. Close packs them inside one octave; Open lifts the inner notes; Drop 1, Drop 2 and Drop 3 drop the top, second or third note down an octave; Wide gives every note its own octave; Auto picks octaves that keep each note near the previous chord for smooth voice leading; Bass only drops the chord and plays just the Bass notes.
- Octave: Shifts the whole chord up or down by up to 2 octaves (range: −2 to +2).
Arpeggiator Section
The second row decides how the chord is walked.
- Arpeggiator: Turns the arpeggiator on for this scene. When off, the chord plays as a block instead of being walked through, and in a plugin with Input off as well, incoming MIDI notes pass straight through. (Only visible in plugin mode.)
- Mode: The path through the chord. See Modes below.
- Rate: How long one arpeggiator step lasts, synced to the host tempo. Options range from 1/32 (fastest) through dotted and triplet divisions up to 1/1 (whole note).
- Octaves: How many octaves the arpeggio climbs through before starting over (1–4).
- Gate: How much of each step the note holds. At 100% the notes run into each other; lower values leave gaps.
- Reset: When the arpeggio jumps back to its first note. Options: New Chord, Bar, 2 Bars, 4 Bars, Never.
Modes
- Up and Down: Lowest to highest, or highest to lowest.
- Up-Down and Down-Up: Out and back, without repeating the turning notes.
- Converge: From the outside in, alternating lowest and highest.
- Diverge: From the middle outward, alternating above and below.
- Thirds: Every other note upward, then back for the ones it skipped.
- Skip: Three notes at a time, wrapping around. On a three-note chord that comes out in order.
- Pedal: Alternates the lowest note with each of the others, always returning to the low note.
- Thumb: Holds the lowest note under a line that climbs through the rest of the chord.
- Spiral: Winds from the outside in to the middle, then back out along the same path.
- Add One: The first note, then the first two, then the first three, growing each pass.
- Double and Stutter: Every note twice, or three times, before moving on.
- Random: A note of the chord picked at random on every step.
- Rotate: Climbs the chord, starting each pass one note higher; the left-out notes return an octave up. Named As Played in earlier versions, where it sounded the same as Up.
Step Grid
A 16-step grid that controls what happens on each arpeggiator step. The grid has four rows (top to bottom):
- Note row (top): Plays one specific note of the chord. Click repeatedly to cycle 1, 2, 3 and so on up to the number of notes the current chord actually has, then off. A number shown in yellow means that note does not exist in the current chord, so the step stays silent; that happens when a chord is made smaller after the step was set.
- Chord row: Marked with a C. Plays all chord notes simultaneously on this step.
- Normal row: Unmarked. Advances to the next note of the arpeggio, following the selected Mode.
- Root row (bottom): Marked with an R. Plays only the root note on this step, useful for anchoring the pattern on downbeats.
Each step can be in only one state at a time. Clicking a row button for a step toggles it on (turning off whatever was active before). Steps with no row active are silent (off).
Scene Selector
A row of 16 numbered buttons at the bottom of the tab. Each button selects a scene to edit. All controls on the Arp tab reflect the currently selected scene. Scenes are independent: each has its own input settings, arp parameters, and step pattern.
Arpeggiator: Modulator
A 16-step modulation grid modulating the Arpeggiator's synth engine, running at the Arpeggiator's own Rate. See Step Modulator for the full reference.
Chords
The Chords module is a chord generator with a built-in gater effect, making it easy to combine harmonic and rhythmic ideas in one place. Select chord types and voicings, then apply rhythmic gating patterns to create everything from lush pads to choppy stabs. Randomization can generate new chord progressions and gating patterns simultaneously.
The following video demonstrates the Chords module in action:
Chords: Chord Engine
The Chords tab is where you design individual chord scenes. The engine holds a chord for as long as the arrangement leaves it in place, and the 16-step gater pattern can chop it into a rhythm. Up to 16 scenes can be created and sequenced together using the Playback selector or the Sequencer module.
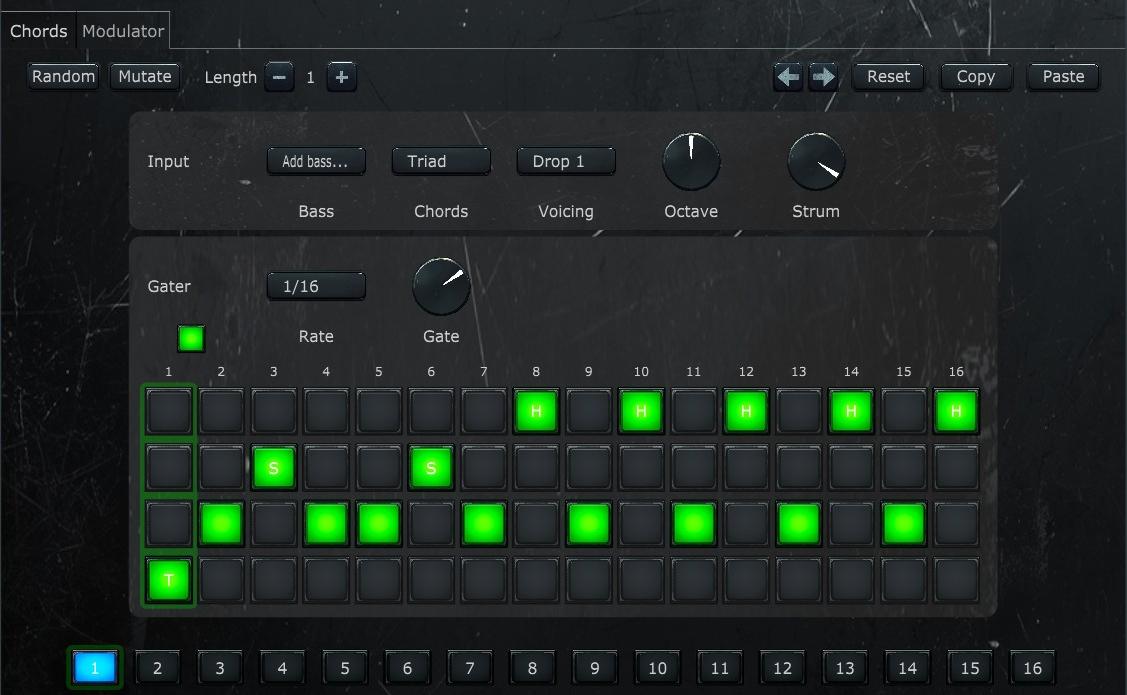
See Tab Menu Bar and Sub-Tab Menu Bar for the general menus.
Input Section
Defines the chord that will be played. The same row as on the Arpeggiator tab, with one dial added.
- Input: Builds a chord from each incoming MIDI note, using the settings in this row. When off, the notes play as they arrive. (Only visible in plugin mode.)
- Bass: What is added below the chord. Options: no bass; the root an octave down; the root one and two octaves down; the fifth an octave down; root and fifth together; or a pedal bass that holds the scale's root under every chord whatever degree is playing.
- Chords: Which chord is built from the current scale degree. Options: Off, Root (single note), Octave (root + octave), Power (root + fifth), Triad, Seventh, Sus4, Sus2, 9th, 11th.
- Voicing: How the chord's notes are laid out. Close packs them inside one octave; Open lifts the inner notes; Drop 1, Drop 2 and Drop 3 drop the top, second or third note down an octave; Wide gives every note its own octave; Auto picks octaves that keep each note near the previous chord for smooth voice leading; Bass only drops the chord and plays just the Bass notes.
- Octave: Shifts the whole chord up or down by up to 2 octaves (range: −2 to +2).
- Strum: Spreads the chord's notes in time instead of striking them together. At 0% all notes strike simultaneously; at the top each note comes an eighth note after the one before it.
Gater Section
A trance-gate effect that rhythmically chops the sustained chord.
- Gater: Chops the held chord into a rhythm with the step pattern. When off, the chord is struck once each time it changes.
- Rate: How long one step of the Gater pattern lasts, synced to the host tempo. Options range from 1/32 (fastest) through dotted and triplet divisions up to 1/1 (whole note).
- Gate: How much of each Gater step the chord sounds. At 100% it sounds for the whole step; at the bottom for a fifth of it.
Step Grid
A 16-step grid that controls the gater behavior on each step. The grid has four rows (top to bottom):
- Hold row (top): Marked with an H. The chord sounds for the whole step.
- Short row: Marked with an S. The chord sounds for half of what the Gate dial allows, producing a short staccato hit.
- On row: Unmarked. The chord sounds for the Gate dial's share of the step.
- Trigger row (bottom): Marked with a T. Restrikes the chord's notes from the beginning, following the Strum setting. Useful for creating rhythmic emphasis on downbeats.
Each step can be in only one state at a time. Clicking a row button for a step toggles it on (turning off whatever was active before). A step left empty is silent. With the Gater on, the chord is only ever restruck by a Trigger step, so a pattern with no T in it holds whatever was already sounding.
Scene Selector
A row of 16 numbered buttons at the bottom of the tab. Each button selects a scene to edit. All controls on the Chords tab reflect the currently selected scene. Scenes are independent: each has its own input settings, gater parameters, and step pattern.
Chords: Modulator
A 16-step modulation grid modulating the Chords synth engine, running at the Gater's Rate. See Step Modulator for the full reference.
Melody
The Melody module plays a single line over the chords the Sequencer's Degree lane provides. It is the one generator with no scenes and no sub-tabs: the grid on the tab is the melody itself, and what you see there is exactly what plays.
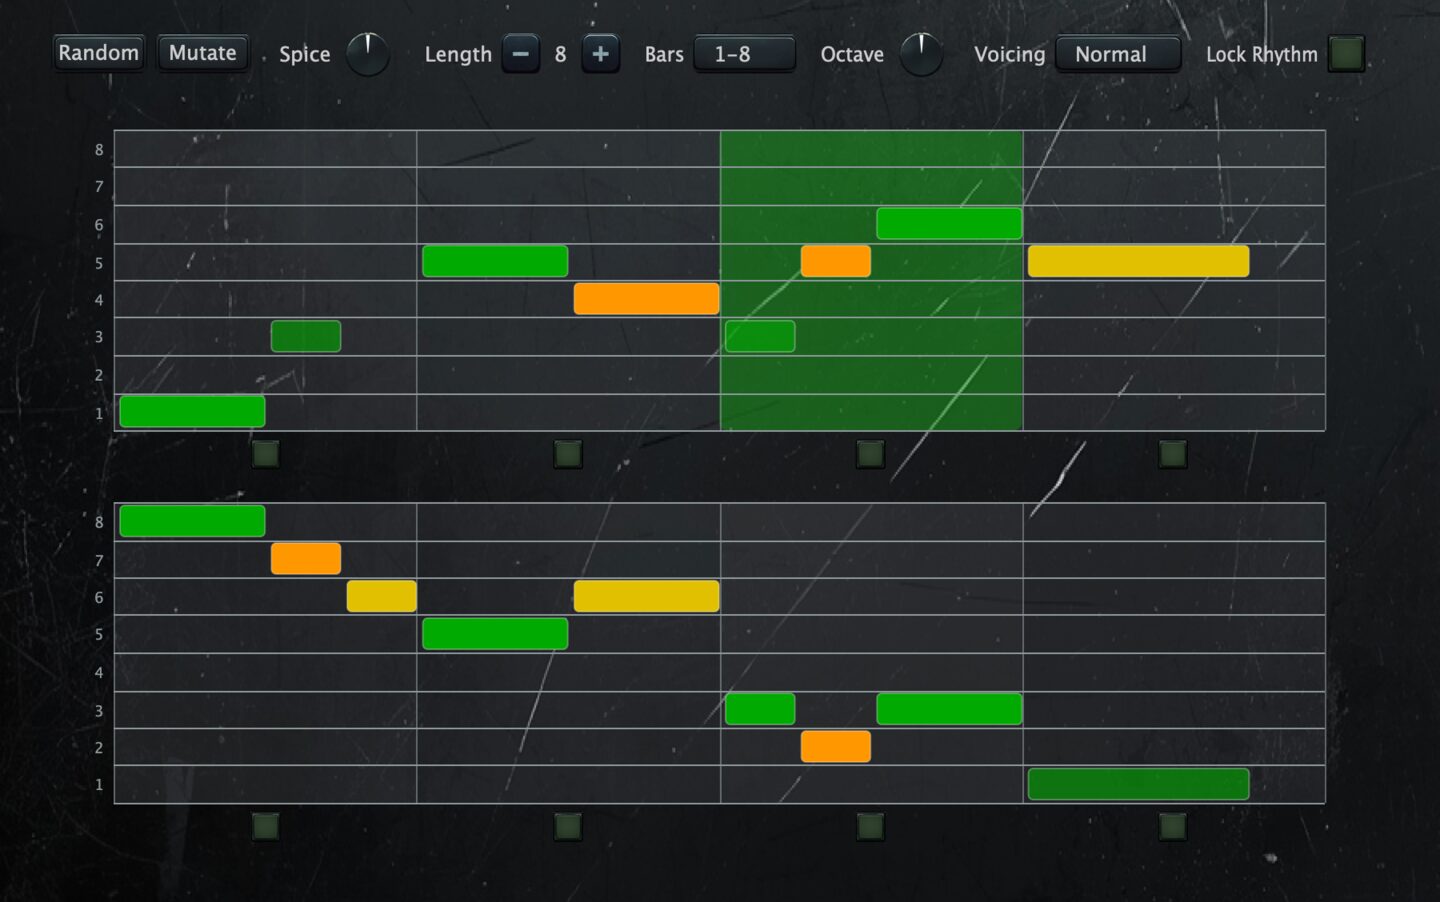
The tab menu bar holds the Enabled checkbox and the preset controls; see Tab Menu Bar. The bar below it holds everything that writes or shapes the melody.
- Random: Writes a new melody over the song's chords.
- Mutate: Moves a few of the notes that are there to another degree and leaves everything else alone.
- Spice: How far Random strays from the safe choice, 0 to 100%.
- Length: How many bars the melody plays before it loops, 1 to 32.
- Bars: Which eight bars the grid shows. The pages overlap by four bars (1–8, 5–12, 9–16 and so on), so a phrase that straddles a page boundary can still be seen in one piece. This only changes the view, never the sound.
- Octave: Shifts the whole melody by up to two octaves either way.
- Voicing: Normal plays the note alone, Double adds the octave above it, Power adds the fifth and the octave.
- Lock Rhythm: Keeps the rhythm on the grid exactly as it stands, so Random re-rolls only the pitches. Mutate never changes the rhythm anyway, so this makes no difference to it.
The melody's volume is not on this tab. It is the Melody dial in the Sequencer tab's Volumes section.
Melody: The Grid
Bars are laid out four to a row, and a second row appears once the Length passes four. Scale degrees run 1 at the bottom to 8 at the top, numbered in the gutter at the left of each row, and a faint tint on every other bar keeps the bars countable.
Notes are colored by how they relate to the chord of their own bar. Green notes are harmonic, while yellow and orange ones indicate more tension and dissonance. A melody usually needs some of that, so there is nothing wrong with using them.
Under each row sits a band of Locked checkboxes, one per bar. Random and Mutate leave locked bars alone and compose around them, so you can keep the parts of a melody that you like and re-roll the rest.
Melody: Editing Notes
- Click inside the grid to move a note to the degree you clicked on. Clicking the empty space of a rest turns it back into a note.
- Drag a note up and down to carry it in pitch.
- Double-click a note to split it in half: a whole bar becomes two halves, a half becomes two quarters. A quarter cannot split any further, so a double-click deletes it and leaves a rest behind.
- Drag either end of a note to change its length in quarter steps. Growing swallows whatever is in the way, shrinking leaves a rest in the space given up, and pulling an edge all the way across removes the note.
Synth
The Synth engine is the sound source at the heart of Snorkel. It features three oscillators plus a noise oscillator, analog simulation, dual filters, an FX section, a three-band EQ, a step modulator, four LFOs and four envelopes. Every parameter is included in the randomizer for fast sonic exploration.
The Synth tab has a separate synth engine for each melodic generator (Patterns, Arpeggiator, Chords, Melody). Use the Engine selector in the tab menu bar to switch between them; everything on the sub-tabs applies to that engine alone. Each engine has its own independent set of tabs with identical controls.
The sub-tabs walk the voice from sound generation to effects: Oscillators, Filters, FX, EQ, Modulator, LFOs and Envelopes.
Synth: Tab Menu Bar
- Engine: Selects which synth engine to edit: Patterns, Arpeggiator, Chords or Melody. Each engine has fully independent sound settings.
- Random: Rolls a fresh sound for the current engine across all the sub-tabs.
- Mutate: Makes small random tweaks to the current engine's parameters.
- Preset: Loads a complete voice for the current engine: oscillators, filters, FX, EQ and modulation. The < and > arrows beside it step to the previous or next voice.
- Save: Saves the current synth configuration as a user preset. See Presets for how saving and editing work.
Synth: Oscillators
The Oscillators tab holds, top to bottom, the oscillator row, the amplitude envelope, the analog character controls and the global controls.
The oscillator row edits one sound source at a time. Its caption is a dropdown that picks Osc 1, 2, 3 or Noise; the five dials in the row always belong to the one currently shown.
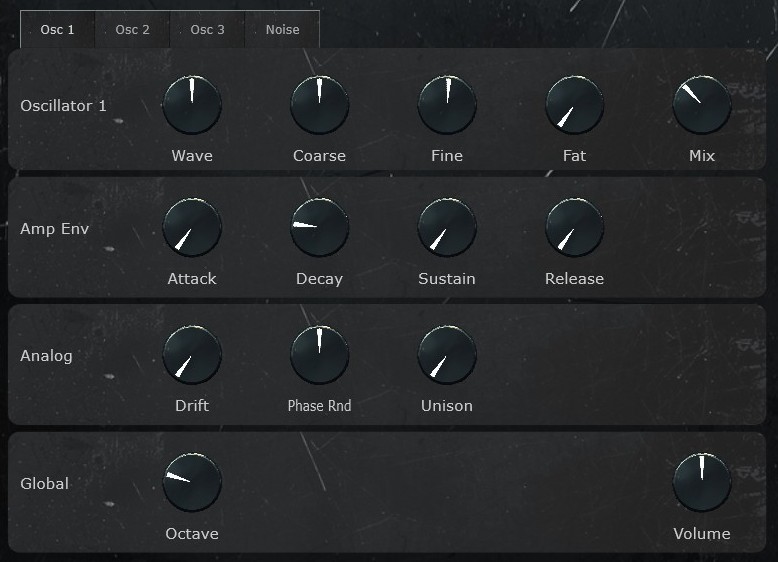
Oscillators 1–3
Each oscillator has the same set of controls:
- Wave: A continuous dial that morphs the waveform from Sine (left) through Saw (center) to Square (right). Intermediate positions blend the neighboring shapes smoothly.
- Coarse: Pitch tuning in semitones. Use this to set intervals between oscillators (e.g., +7 for a fifth, +12 for an octave).
- Fine: Fine pitch tuning in cents; 100 cents is one semitone. Small detuning between oscillators creates a thicker, richer sound.
- Fat: Stacks detuned copies of the oscillator for a thicker, wider sound. Extreme settings deliberately turn unstable.
- Mix: The oscillator's level in the blend.
Noise Oscillator
- Type: Morphs the noise color from bright white through darker pink to a focused midrange band.
- Attack: How long the noise takes to fade in after a note starts.
- Decay: How quickly the noise fades; at the top it does not fade at all. The noise has its own envelope, so it can be shorter or longer than the note carrying it.
- Filter: Cuts the low end of the noise; higher settings leave only hiss.
- Mix: How much noise is added to the oscillators. Set to 0 to disable noise.
Amp Envelope (ADSR)
Controls the overall volume shape of each note:
- Attack: Time for the volume to rise from silence to full level.
- Decay: Time for the volume to fall from the peak to the sustain level.
- Sustain: Volume level held while the note is held down.
- Release: Time for the volume to fade to silence after the note is released.
Analog Section
Adds the small instabilities of analog hardware:
- Drift: Slow, slight pitch wander, as on analog synths.
- Phase Rnd: Starts each note at a random point in the wave, so repeated notes vary slightly instead of sharing one identical attack transient.
- Unison: Widens and thickens all oscillators at once with gentle detuning.
Global Section
- Octave: Shifts the whole engine up or down in octaves.
- Volume: The engine's volume before its FX. The FX tab has a second Volume dial after the FX, so the two bracket the effects chain.
Random and Mutate in the menu bar work on the Oscillators and Filters tabs together: Random rolls fresh settings for both, Mutate nudges them slightly for a variation instead of a reroll.
Synth: Filters
Snorkel provides dual filters with flexible routing. Each filter has its own set of controls and a dedicated modulation envelope.
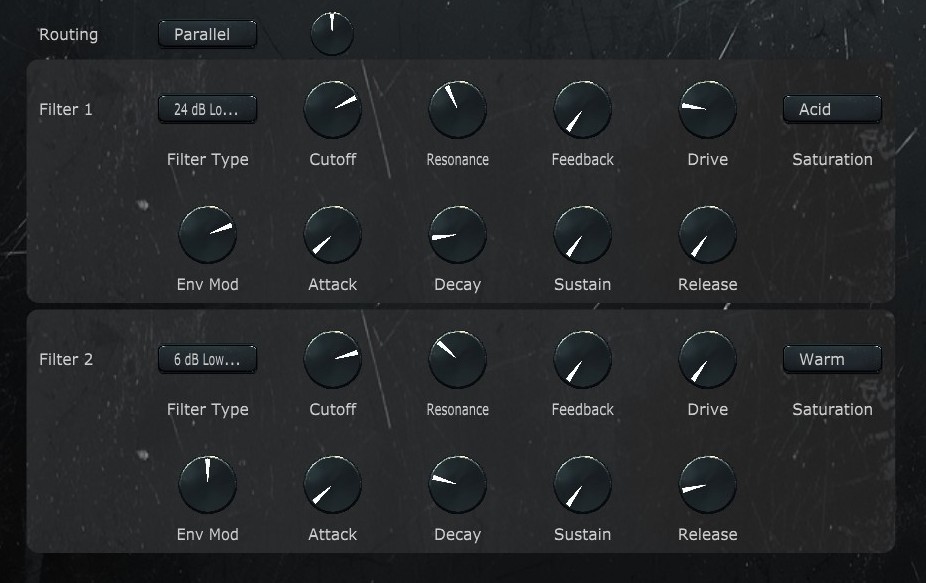
Routing
- Routing: How the signal moves through the two filters. Options: Filter 1 only, Filter 2 only, Parallel (both filters process the sound side by side and their outputs are blended with the Mix dial), Serial (the sound passes through Filter 1, then Filter 2), Off (no filtering).
- Mix: In Parallel routing, the balance between Filter 1 and Filter 2.
Filter 1 / Filter 2
Both filters carry the same controls. The first row shapes the filter itself:
- Filter Type: The four lowpasses (6, 12, 24 and 36 dB) all cut the highs above the cutoff, and the higher the number the steeper the cut. The other types: Bandpass (keeps a band around the cutoff and cuts above and below), Highpass (cuts the lows below the cutoff), Notch (cuts a band around the cutoff and keeps the rest), Comb (a row of narrow peaks and dips; metallic and hollow).
- Cutoff: The filter's working frequency; for lowpass types, higher is brighter.
- Resonance: Boosts the frequencies around the cutoff. Above 1.0 the filter self-oscillates: it produces a tone of its own even with no input.
- Feedback: Adds bite at the resonant peak. It is scaled by Resonance, so it does nothing while Resonance is at zero.
- Drive: How hard the signal is pushed into the chosen Saturation curve; at zero, saturation is off.
- Saturation: The character of the distortion Drive pushes into. Options: Clean (the most transparent curve, gentle soft clipping), Warm (gentle saturation that adds body), Tube (rounded, tube-style saturation), Hard (abrupt clipping with a raw edge), Acid (slamming distortion with digital grit).
Filter Envelope (ADSR)
The second row is the filter envelope, which sweeps the cutoff over each note:
- Env Mod: How far the envelope sweeps the cutoff on each note.
- Attack: How long the sweep takes to rise after a note starts.
- Decay: How long it takes to settle to the sustain level.
- Sustain: The sweep level held while the note plays.
- Release: How long the sweep takes to die away after the note ends.
Synth: FX
The FX tab contains the post-filter effects chain: Modulation, Delay, Grit and Reverb, each in its own box with an enable toggle beside the caption, plus the engine's output volume. The signal flows through them in that order.
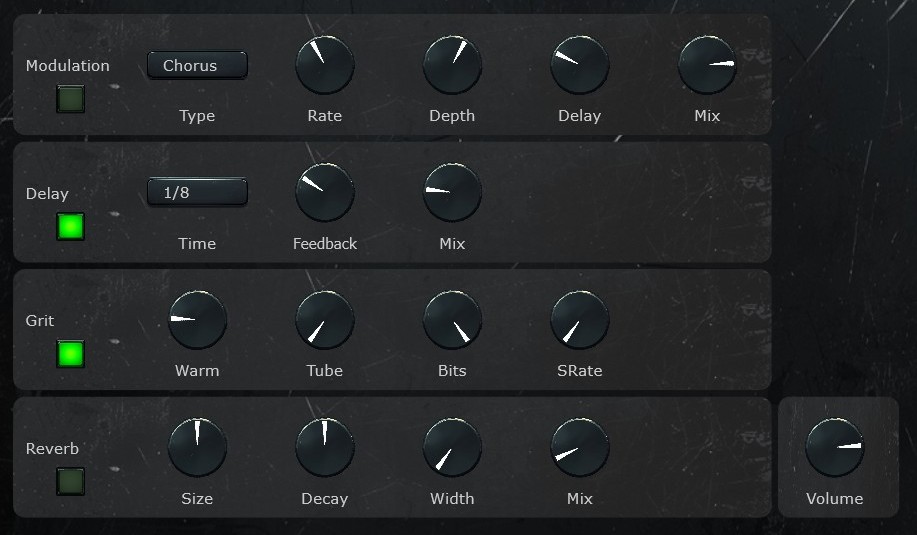
Modulation
Adds movement to the sound.
- Type: Chorus (detuned copies thicken and widen the sound), Flanger (a metallic jet-plane sweep, the most aggressive of the three), or Phaser (sweeping notches, a softer swirl than the flanger).
- Rate: The speed of the sweep. Slow drifts, fast wobbles.
- Depth: How far the sweep travels.
- Feedback: Makes the sweep sharper and more resonant. Flanger and Phaser only.
- Delay: The spacing of the chorus voices. Short is subtle; long turns into a doubling effect. Chorus only.
- Mix: Balance of dry sound and effect.
Delay
Adds echoes, synced to the tempo unless the mode is Free.
- Mode: Normal (straight tempo-synced echo, both channels together), Free (unsynced echo; the Time control becomes a milliseconds dial instead of note values), Ping Pong (echoes alternate between left and right), Tape (echoes darken and saturate as they fade, like a worn tape machine).
- Time: Echo spacing as a note value; a dot marks a dotted value (1.5x) and a T a triplet. In Free mode, echo spacing in milliseconds instead.
- Feedback: How many times the echo repeats before fading out.
- Mix: Balance of dry sound and echoes.
Grit
Saturation and lo-fi digital dirt.
- Warm: Soft saturation that adds body and gentle drive.
- Tube: Tube-style drive; harder and grittier than Warm.
- Bits: Reduces the bit depth; fewer bits mean crunchier, noisier digital grit. 16 is clean.
- SRate: Reduces the sample rate; higher settings are rougher and more aliased.
Reverb
Adds space and ambience.
- Mode: Hall (a large natural space, the all-rounder), Room (a small, tight space with a fast decay), Plate (dense and smooth, even and bright), Bright (hall with extra top end, airy and glassy), Shimmer (octave-up sparkle in the tail), Ducked (the tail stays low while notes play and blooms in the gaps).
- Size: How big the space feels.
- Decay: How long the tail rings out.
- Mix: Balance of dry sound and reverb.
- Width: Stereo spread of the reverb, mono to full width. In Shimmer mode this dial becomes Amount (how much sparkle); in Ducked mode it becomes Ducking (how hard the tail is pushed down while notes play).
Output
- Volume: The engine's volume after the FX, the counterpart of the Oscillators tab's Volume before them.
Random and Mutate in the menu bar work on this tab alone: Random rolls a fresh FX setup, deciding which effects are on and how they are set; Mutate nudges the current settings for a variation instead of a reroll.
Synth: EQ
The last stage before the engine's output volume: a three-band EQ with sweepable cut filters at the ends. It sits after the FX, so it shapes the finished sound including the delay and reverb tails. There are no Random or Mutate buttons here; the EQ is a corrective stage meant to be dialed by hand.
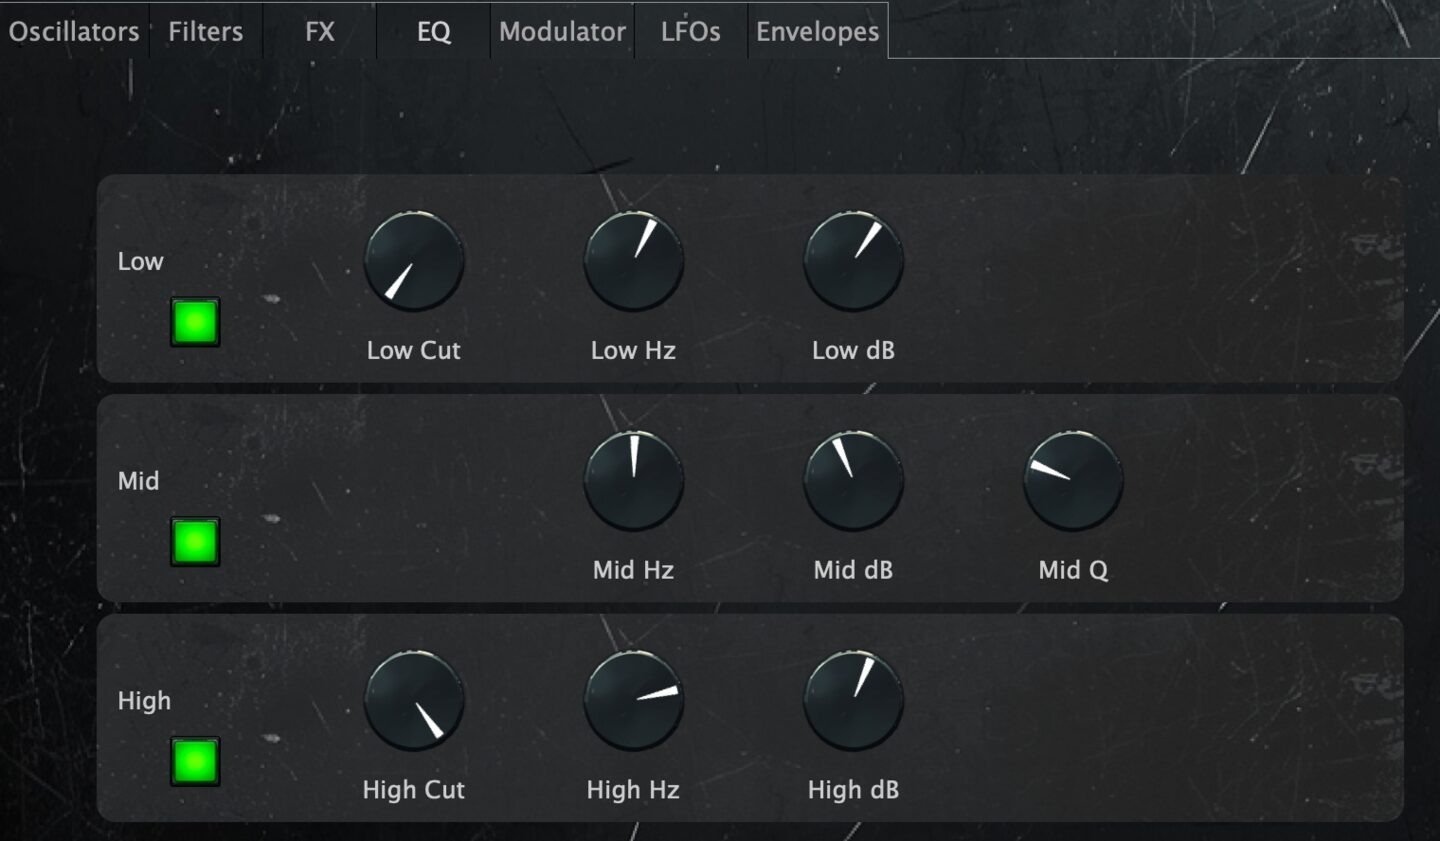
Each row is one band with its own enable toggle beside the caption, and a row's dials do nothing while its toggle is off:
- Low: Low Cut removes everything below its frequency (turned all the way down it is off); Low Hz picks a frequency and Low dB boosts or cuts everything below it, up to 15 dB either way.
- Mid: Mid Hz sets the center of a range, Mid dB boosts or cuts it, and Mid Q sets how far the boost or cut reaches: low is wide, high is narrow.
- High: High Hz picks a frequency and High dB boosts or cuts everything above it; High Cut removes everything above its own frequency (turned all the way up it is off).
Note that the cut filters belong to their rows: Low Cut only works while the Low row is enabled, and High Cut only while the High row is enabled.
Synth: Modulator
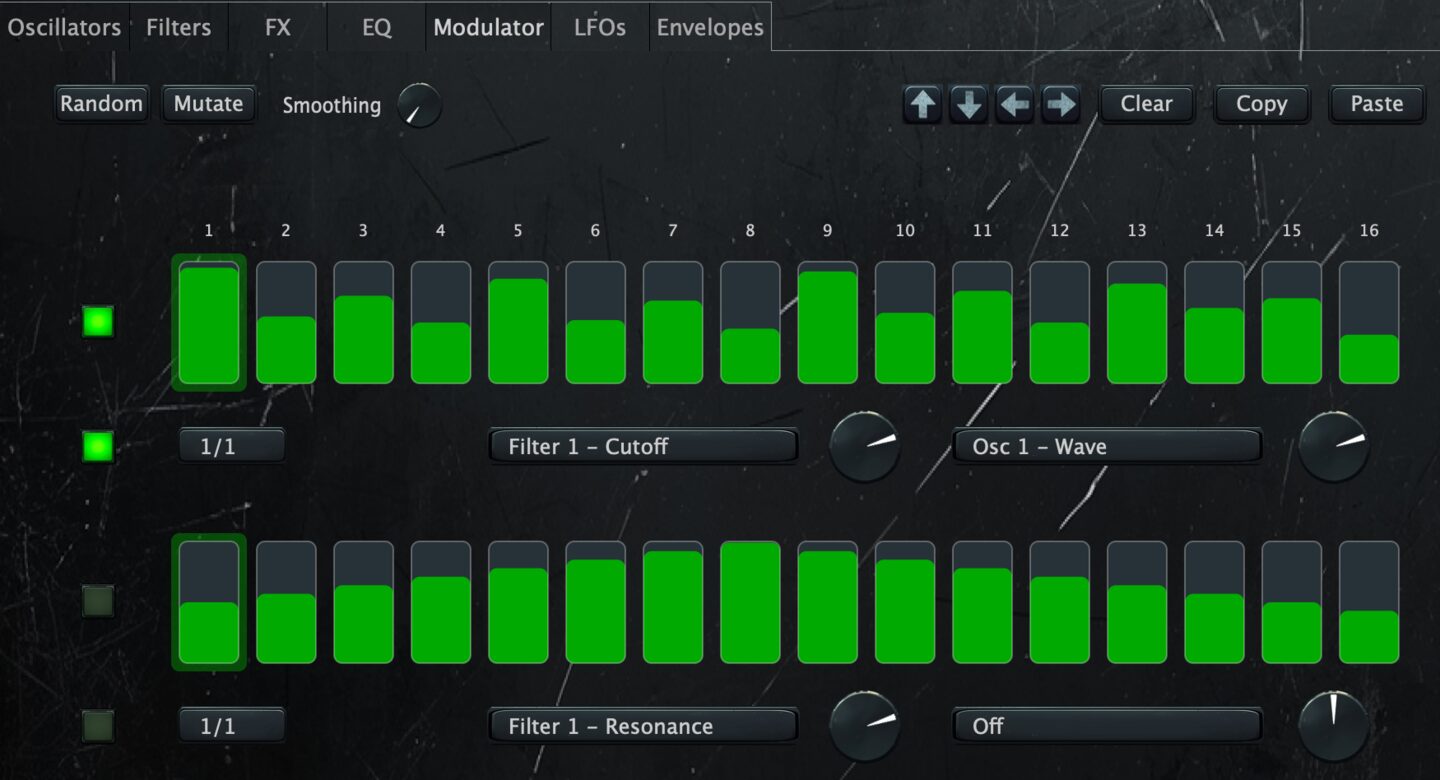
Two step LFOs (StepLFO 1 and StepLFO 2), each drawing its waveform from 16 fill bars instead of a fixed shape, and each with its own Rate. See Step Modulator for the full reference, and Sub-Tab Menu Bar for the general menu.
Synth: LFOs
The LFOs tab provides four Low Frequency Oscillators (LFOs 1–4), each modulating one target control. Each LFO is displayed as a row with the following controls:
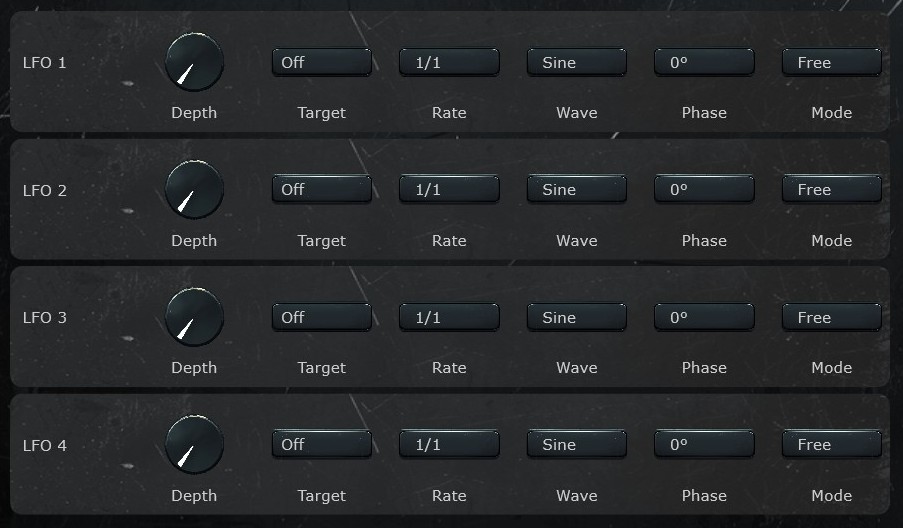
- Depth: How far the LFO swings its target above and below that control's setting. At 0 the LFO is off.
- Target: The control the LFO moves. Can target any oscillator, filter, or FX parameter.
- Rate: How long one cycle takes, synced to the host tempo: 1/1 is one bar, 1/16 a sixteenth note, 16/1 sixteen bars.
- Wave: The shape of the movement. Sine (a smooth rise and fall), Triangle (falls then rises in straight lines), Ramp Up and Ramp Down (a steady rise or fall, then a snap back), Square (top for half the cycle, bottom for the other half), Sample & Hold (jumps to a new random level once per cycle and holds it), Smooth S&H (glides to a new random level each cycle instead of jumping), Drift (wanders in small random moves, drifting back toward the middle), Decay (falls fast at first, then eases into the bottom; a curved, plucky fall where Ramp Down is even), Impulse (four quick swings that fade out, restarting each cycle).
- Phase: Shifts the starting point within the cycle, by 0, 90, 180 or 270 degrees. The three random waves (Sample & Hold, Smooth S&H, Drift) ignore it.
- Mode: How the LFO relates to notes. Free (runs continuously, ignoring notes, so every note meets the LFO wherever it is), Loop (restarts the cycle on every note and loops while the note holds), One Shot (runs one cycle on each note, then freezes until the next note), Decay 1x/2x/4x/8x (restarts on each note and fades the LFO out over that many cycles).
Any mode other than Free makes the LFO per note: each held note runs its own cycle, so the notes of a chord can sit at different points of the wave. LFOs pointed at an FX target are the exception, since the engine has a single shared LFO there: those modes restart it whenever a new note starts instead of running per held note.
Random in the menu bar rolls a random setup for the four LFOs; Mutate nudges the active ones slightly.
Synth: Envelopes
The Envelopes tab provides four ADSR modulation envelopes. Unlike the LFOs they do not cycle: each one triggers on every note and pushes its target along the classic attack, decay, sustain, release shape. Each envelope is displayed as a row:
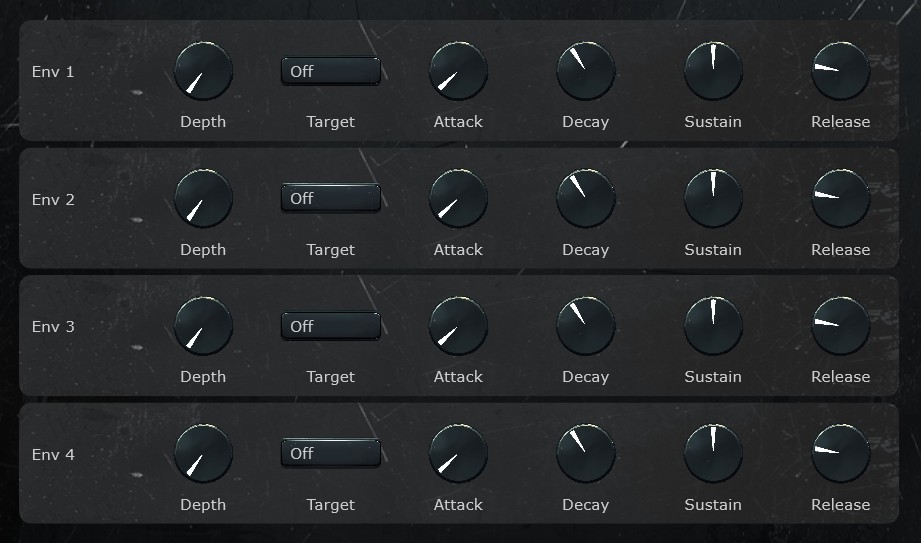
- Depth: How far the envelope pushes its target. It pushes upward only, and 0 turns it off.
- Target: The control the envelope pushes. Same target list as the LFOs.
- Attack: How long the push takes to reach full strength after a note starts.
- Decay: How long it takes to fall to the sustain level.
- Sustain: The push level held while the note plays.
- Release: How long the push takes to die away after the note ends.
Random in the menu bar rolls a random setup for the four envelopes; Mutate nudges the active ones slightly.
Drums
The Drums module is a dedicated drum machine for generating percussive patterns and grooves. Design rhythmic foundations for your ideas with an intuitive step-based interface. Randomization can generate complete drum patterns that lock in with your melodic and harmonic ideas.
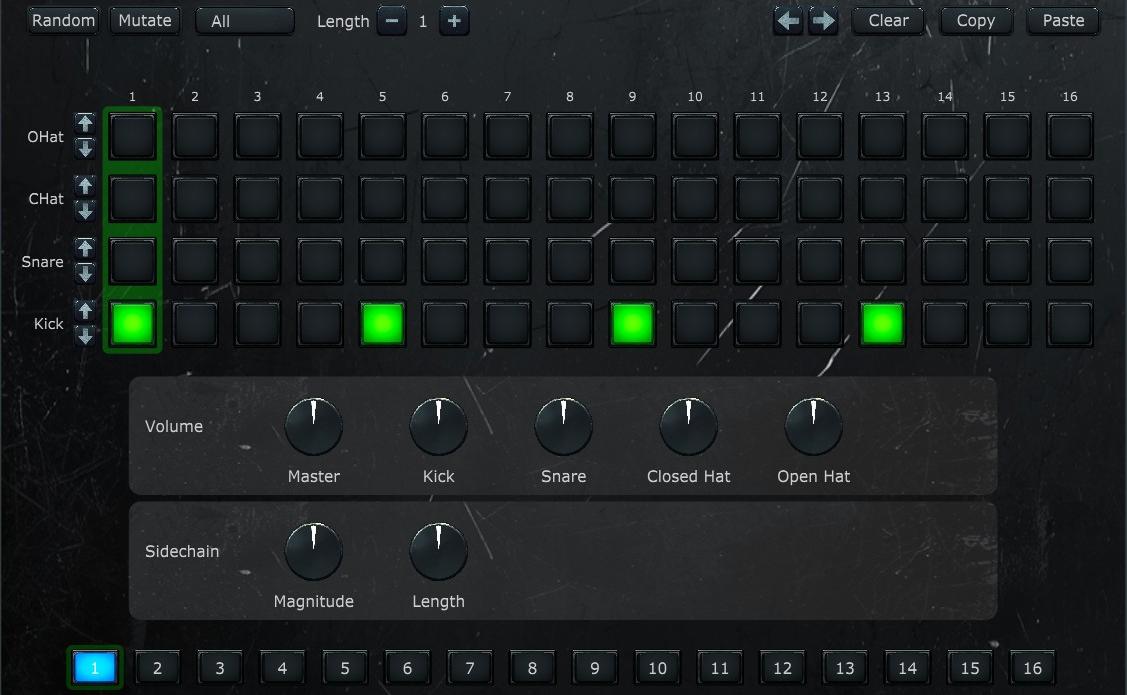
The Drums tab features a 16-step grid with four lanes (Kick, Snare, Closed Hat, Open Hat), each with selectable samples. Up to 16 scenes can be created and chained together using the Playback selector or the Sequencer module.
See Tab Menu Bar and Sub-Tab Menu Bar for the general menus.
Step Grid
A four-lane by 16-step grid, from the bottom lane up: Kick, Snare, Closed Hat and Open Hat. Click a cell to place a hit, click it again to remove it. The current playback position is highlighted during playback.
Sample Selectors
The up and down arrows beside each lane step through the sample files available for that lane; the messaging strip names the one you land on. Different samples provide tonal variation within each drum category.
Volume and Sidechain
- Lane Volumes: Individual volume dials for each of the four drum lanes.
- Master Volume: Overall drum machine output volume.
- Sidechain Magnitude: How far the synth engines are pushed down on each kick, the classic pumping effect. The drums themselves are never ducked.
- Sidechain Length: How long the ducking takes to recover, up to twice a step.
Scene Selector
A row of 16 numbered buttons at the bottom of the tab. Each button selects a scene to edit. All controls on the Drums tab reflect the currently selected scene. Scenes are independent: each has its own drum pattern across all four lanes.
Note that the Drums do not follow the Root or Scale settings; they are samples, not notes.
Sequencer
The Sequencer is where the engines become a song. It lets you combine outputs from the individual generators (Patterns, Arpeggiator, Chords, and Drums) and arrange them into a full musical idea that plays out over time. Use it to audition how your different modules work together.
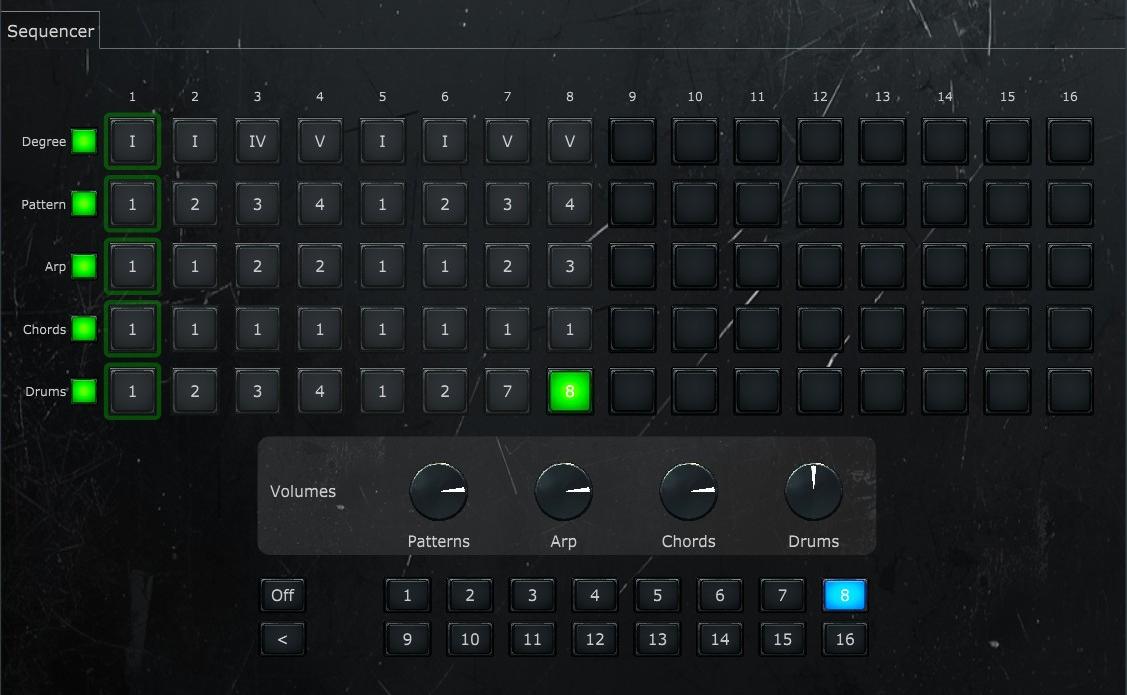
The Sequencer uses a matrix of 16 steps across and five lanes down to control which scene each generator module plays on each step. This lets you create arrangements where, for example, the arp switches scenes every 2 steps while the chords hold for 4.
Tab Menu Bar
- Enabled: Turns the Sequencer on or off. When off, every engine simply repeats its own selected scene.
- Position: A read-only readout showing the bar and beat while the transport runs.
- Preset: Selects a sequencer preset.
- Save: Saves the current arrangement as a user preset. Saving here offers a full song, which stores the engines' patterns and sounds too, or degrees only.
The bar directly above the matrix holds Steps: how many steps the arrangement runs before looping. Steps past that point are dimmed and skipped during playback.
Matrix Grid
A five-lane by 16-step grid. Each lane controls a different aspect of the arrangement:
- Degree: Sets the scale degree (I–VII) for each step, setting the root for Chords and Arp and transposing the Patterns engine. This is how you create chord progressions.
- Pattern: Which Patterns scene (1–16) plays on each step.
- Arp: Which Arpeggiator scene (1–16) plays on each step.
- Chords: Which Chords scene (1–16) plays on each step.
- Drums: Which Drums scene (1–16) plays on each step.
Click a cell to select it, then use the Step Values buttons below the matrix to give it a value. Setting any value also switches that engine's Playback dropdown to Sequencer, so the lane takes control; in the Degree lane it switches on the Degree checkbox instead.
Step Values
- Number: Picks which of that engine's 16 scenes plays at that step. In the Degree lane the numbers are scale degrees I to VII instead, written as Roman numerals.
- Off: Leaves that lane silent for that step.
- < (Repeat): Sends the lane back to step 1 from there. Because each lane loops on its own marker, lanes can run at different lengths against each other.
Lane Checkboxes
The checkbox beside each lane label is that engine's Enabled switch, the same one as on its own tab. The Degree checkbox is its own thing: it lets the Degree lane drive the progression. With it off, the song stays on the root: Chords and Arp play the I chord and Patterns is untransposed. In a DAW without Autoplay it starts off, because the host's MIDI is controlling pitch instead. Sequencer presets save this checkbox and restore it on load; the factory presets switch it on.
Engine Volumes
The Volumes section balances the five engines against each other. The Patterns, Arp, Chords and Melody dials are the same Volume that sits after the FX on the Synth tab; the Drums dial is the drum kit's master level.
Step Modulator
The Step Modulator is a 16-step modulator that continuously modulates synth parameters. It appears in four places: on Patterns, Arpeggiator, Chords, and the Synth.
Each row contains 16 vertical fill bars defining a continuous modulation shape, from −1 to +1. Drag a bar up for a positive value, down for a negative value, or leave it at center for no modulation. The shape cycles continuously at the row's rate.
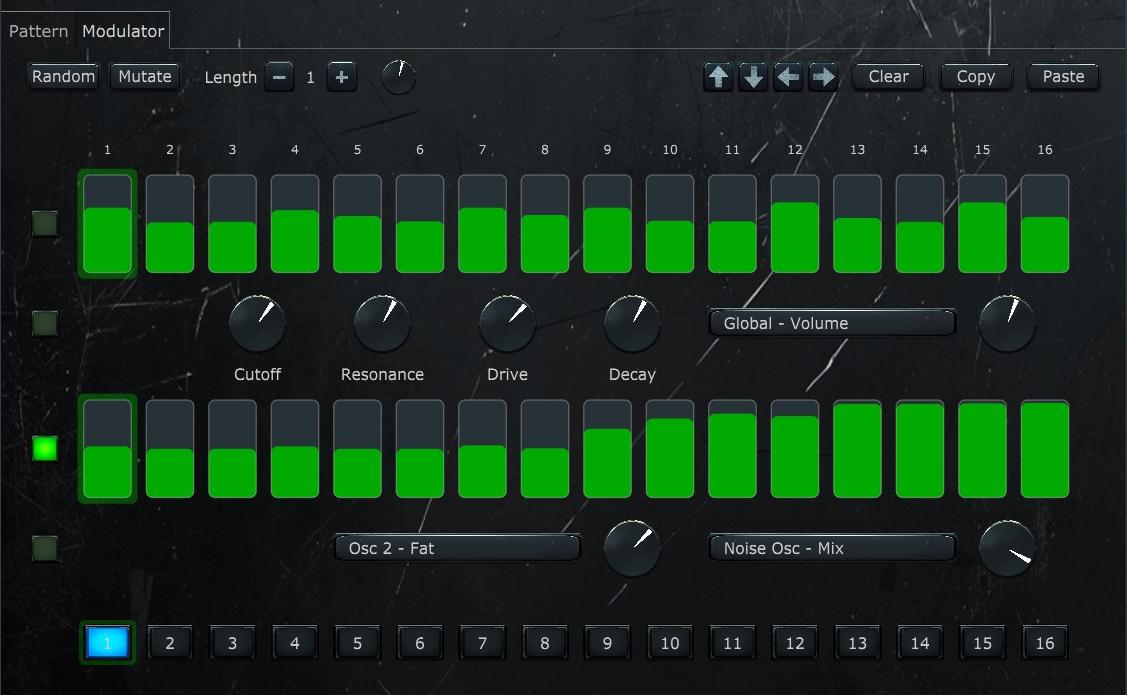
Modulator Tab: Patterns, Arpeggiator, Chords
The Modulator tab has two rows and a scene selector, and runs at the engine's own step rate (the Gater's Rate on the Chords tab). Scene numbers correspond directly to the parent module's scenes: scene 3 in the Modulator is the modulation layer for scene 3 in the parent module.
Modulation Row 1
Row 1 feeds four fixed Accent dials that scale the fill bar shape independently for four key parameters:
- Cutoff: How far the row's steps move Filter 1's cutoff, up to 2000 Hz either way.
- Resonance: The same idea for Filter 1's resonance.
- Drive: The same for the Drive on the Filters tab.
- Decay: The same for Filter 1's envelope decay.
Each dial is bipolar: center (12 o'clock) means no modulation regardless of the fill bar values; turning it up or down sets the maximum positive or negative modulation depth. Row 1 also has one flexible Mod1 Target selector and Amount dial for routing the fill bar shape to any other synth parameter.
Modulation Row 2
Row 2 has two fully flexible modulation slots and no fixed accents. Each slot has a Target selector (any synth parameter) and an Amount dial that scales the fill bar shape for that destination. A zero Amount is no modulation, and a negative Amount turns the row's ups into downs.
Smoothing
Smoothing in the menu bar sets how much the steps glide into each other, from stepped at 0% to a continuous shape at 100%. It is one dial for both rows.
Row Checkboxes
Four checkboxes in the left gutter determine which parts the editing buttons act on: Row 1's steps, Row 1's dials, Row 2's steps, and Row 2's targets. They do not affect the sound. Random, Mutate, the shift and adjust arrows, Clear, Copy and Paste all work on the checked rows only, and the clipboard is shared across tabs.
Modulator Tab: Synth
The Synth's Modulator tab holds two step LFOs (StepLFO 1 and StepLFO 2) using the same fill bar concept. Both rows are fully flexible: each has its own Rate and can target two parameters at once through Target and Amount controls, with both targets riding the same pattern. There are no fixed Accent dials and no scene selector, since the settings are part of the synth engine rather than tied to individual scenes. A step position indicator highlights the current step during playback.
The Rate sets how long the whole 16-step pattern takes: at 1/1 it spans one bar, so each step is a sixteenth note; at 4/1 it spans four bars. The pattern follows the transport, restarting when playback starts and running freely against the notes.
This is a different modulator from the one on the Patterns, Arpeggiator and Chords tabs: that one runs at the engine's step rate and carries the Accent dials, while this one has its own Rate and is purely a shape.
Presets
The Presets tab provides a centralized place to browse, load, rename, and delete presets for all modules. While each module tab has its own quick-access preset dropdown, this tab gives you a full scrollable list with more detail and management options.
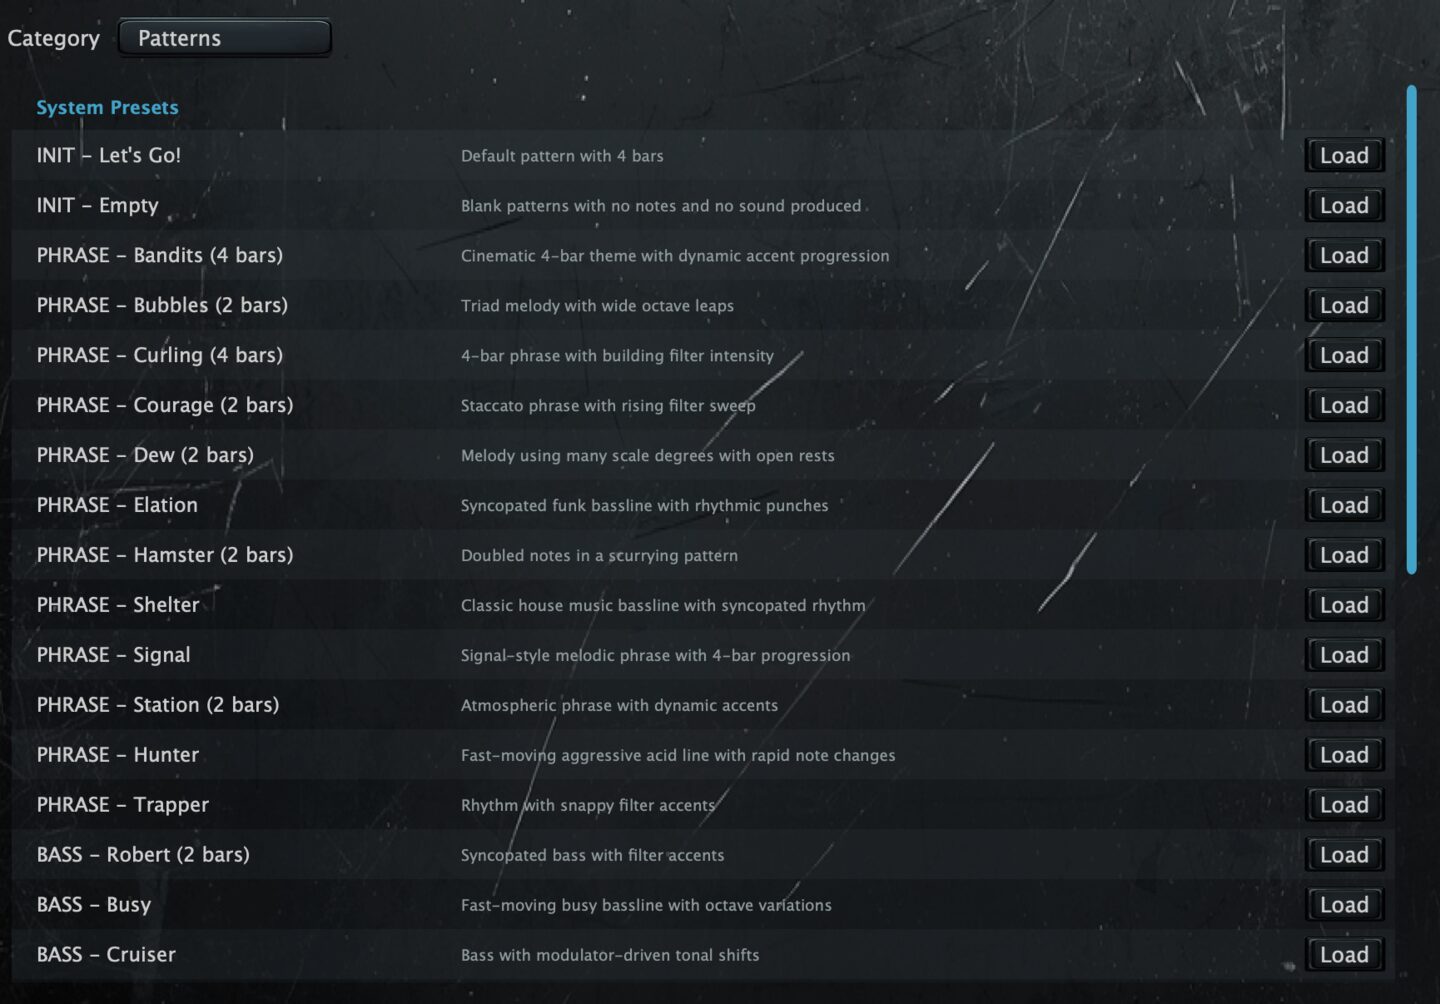
Tab Menu Bar
- Category: Selects which module's presets to display. Options: Patterns, Arpeggiator, Chords, Sequencer, Melody, Synth, Drums.
- Engine: When the Synth category is selected, this additional dropdown selects which engine a loaded preset goes to: Patterns, Arpeggiator, Chords or Melody. Hidden for other categories.
Preset List
A scrollable list of all presets in the selected category, split under two headings:
- System Presets: Built-in presets that ship with Snorkel. These are read-only: they cannot be overwritten, renamed or deleted.
- User Presets: Presets you have saved. These can be freely loaded, renamed, or deleted.
Each preset row shows the preset name and description, along with three buttons:
- Load: Loads the preset into the corresponding module, exactly as picking it from that tab's own preset menu would.
- Rename: Edits the name and description of a user preset. Disabled for system presets.
- Delete: Deletes a user preset. Disabled for system presets.
Saving and Editing Presets
The Preset dropdown, the < and > arrows that step through the list (wrapping around at the ends) and the Save button appear on every engine tab, the Sequencer and the Synth. While one of your own presets is selected, the Save button reads Edit instead.
Save opens a dialog with a name field and Save As; Edit opens the same dialog prefilled with the preset's name and adds Overwrite and Delete. Save As always creates a new preset. Overwrite replaces the selected preset with the current state, and changing the name before overwriting renames it. Delete asks for confirmation first. The Enter key always acts as Save As, so it can never overwrite by accident. With a system preset selected you can only Save As.
Settings
The Settings tab contains global configuration options that affect the entire plugin.
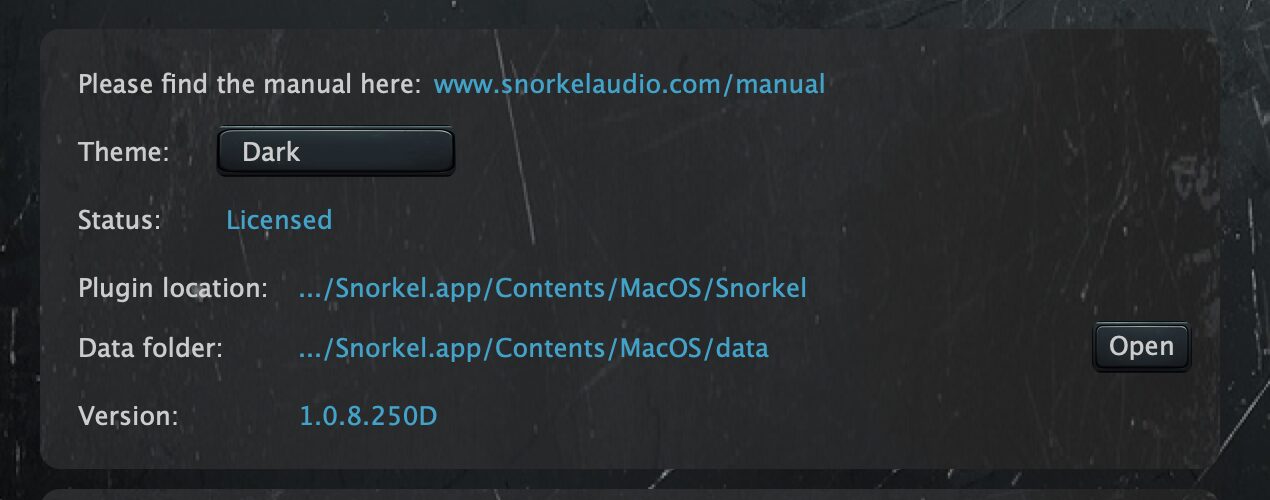
Theme
Selects the look of the plugin. Scientist is the default, with hand-drawn dials and buttons on a lab-textured background; Dark and Light are flat looks on a dark or light background; Parrot is the colorful one, bright reds, yellows and greens on deep blue.
License
Paste a serial number and press Activate. The label to the right shows whether the copy is licensed or running in demo mode. This row is not shown on iPad, where the App Store handles licensing.
Info
- Manual: A link to the online manual.
- Plugin location and Data folder: Where Snorkel is installed, and where it reads presets and drum samples from. Open reveals the data folder in the file browser. If either presets or samples are missing, a note appears here. These rows are shown for the standalone app and the VST3; the AU and the iPad app carry their data inside the bundle, so they leave them out.
- Version: The version you are running.
Host Settings
A further group of settings appears when Snorkel runs as a plugin inside a host app (such as a DAW or AUM on an iPad):
- Generate Sound: When off, the engines still run and send MIDI but make no sound of their own. Use this if you only want Snorkel as a MIDI generator.
- Send MIDI Out: Sends the engines' notes to the host as MIDI, so other instruments can play them, and enables the per-engine channel dropdowns below it. Patterns, Arpeggiator, Chords and Drums each get one, and each can be given a channel from 1 to 16 or left Off.
- Autoplay: When on, the host's transport starts and stops the engines. When off, they wait for an incoming MIDI note.
These host settings are stored in the DAW project, not in Snorkel's own presets.
Main Menu Bar
The main menu bar is the strip at the very top of the plugin window, above the tabs. It holds the settings that apply to everything at once.

- Play / Stop: Starts or stops Snorkel's playback. In a DAW the host's transport takes over and this button is hidden.
- BPM: Sets the tempo in beats per minute (60–200). Also hidden in a DAW, where the host's tempo is used.
- Root: The key. Every scale degree on the other tabs is counted from this note. Options: C, C#, D, D#, E, F, F#, G, G#, A, A#, B. The Drums are unaffected.
- Scale: Which scale the degrees resolve to. Major and Minor are the standards; Dorian, Phrygian, Lydian, Mixolydian, Aeolian and Locrian are the other modes; Harmonic Minor and Melodic Minor raise the seventh (and sixth); Pentatonic Major, Pentatonic Minor and Blues have fewer than seven notes, so their top degrees repeat the octave.
- Swing: Delays every second step for a shuffled feel. At 0% timing is straight, and the setting applies to all engines.
- Volume: The output level of the whole plugin, after every engine.
At the very bottom of the window sits the messaging strip. Every control you touch reports itself there, and most add a one-line description of what they do.
Tab Menu Bar
The tab menu bar runs across the top of each generator module tab (Patterns, Arpeggiator, Chords, Drums) and contains global controls for that module.

- Enabled: Turns the module on and off. While it is off the engine makes no sound and ignores incoming MIDI, and its play indicators show gray instead of color.
- Playback: Controls which scene plays, independently of the one you have selected for editing. Selected plays the scene highlighted in the scene bar and follows you when you pick another. Sequencer hands the decision to the module's lane on the Sequencer tab, step by step; this is what you want for a song. Scene 1 and Scenes 1-N run a fixed cycle through the first N scenes, ignoring what is selected; the cycles on offer are 1-2, 1-3, 1-4, 1-6, 1-8, 1-12 and 1-16.
- Rate: How long one step lasts, as a note value synced to the host tempo. Options range from 1/32 (fastest) up to 1/1 (whole note); a dot marks a dotted value and a T a triplet. Present on Patterns and Drums only. On Arpeggiator and Chords, rate is set per-scene within the sub-tab.
- Preset: Selects a saved preset for this module, with < and > beside it to step through the list.
- Save: Saves the current configuration as a user preset. See Presets for how saving and editing work.
Every Playback setting except Sequencer writes its choice straight into that engine's lane on the Sequencer tab, so the two views never disagree.
On the Arpeggiator and Chords tabs the bar also carries a readout naming the notes the engine is playing while the transport runs.
The Melody tab carries a shorter version of this bar: it has no scenes to choose between and no Rate of its own, so only the Enabled checkbox and the preset controls appear.
Sub-Tab Menu Bar
The sub-tab menu bar appears in the edit area of each sub-tab and contains randomization and editing controls. All sub-tabs share a common set; some have additional controls specific to their content.

Common Controls
- Random: Generates new random content for the selected scene(s).
- Mutate: Nudges the current content for a variation instead of a reroll.
- Length: Sets how many consecutive scenes (1–8) are randomized or mutated together, counting from the selected one. Not present on the Synth's Modulator tab.
- ◀ / ▶: Shifts the pattern one step to the left or right, wrapping around.
- Reset / Clear: Resets or clears the current scene. Called Reset on most tabs, where it returns the scene to the INIT preset; called Clear on the Pattern, Drums and Modulator tabs, where it empties the pattern or sets the fill bars to zero.
- Copy / Paste: Copies or pastes the current scene's data, through a clipboard shared across tabs. On the Arp and Chords tabs this moves the whole scene, including the Input row.
Additional Controls by Tab
- ▲ / ▼: Moves every note one scale degree up or down (carrying into the next octave at the ends), or raises and lowers every fill bar. Present on the Pattern and Modulator tabs.
- Density: Controls how many notes Random puts into a pattern (0%–100%). It leaves existing patterns alone. Pattern tab only.
- Smooth: Controls how much the steps glide into each other. Modulator tabs only.
- Rate: Sets the modulation cycle rate, independent from the note rate. On the Synth's Modulator tab only, where each row has its own; the engine tabs' Modulator runs at the engine's rate instead.
- Lane selector: Selects which drum lane Random and Mutate act on (All works the whole kit). Drums tab only.
- Follow: Retargets the grid to whichever scene is currently sounding. It is a viewing aid only, it is shared by all four grid tabs, and it is grayed out unless something other than your own selection is driving playback: the Sequencer has to be enabled and the tab's Playback set to anything but Selected.